
If you’re trying to create content consistently, the hardest part is rarely creativity. It’s the process. You sit down with a good intention, open your laptop, and suddenly you’re stuck: topic? hook? script? thumbnail? captions? editing? And before you know it, your “30 minutes” turns into a full evening with nothing published.
That’s exactly why I love a simple workflow. A workflow reduces stress. A workflow removes guesswork. A workflow tells you what to do next.
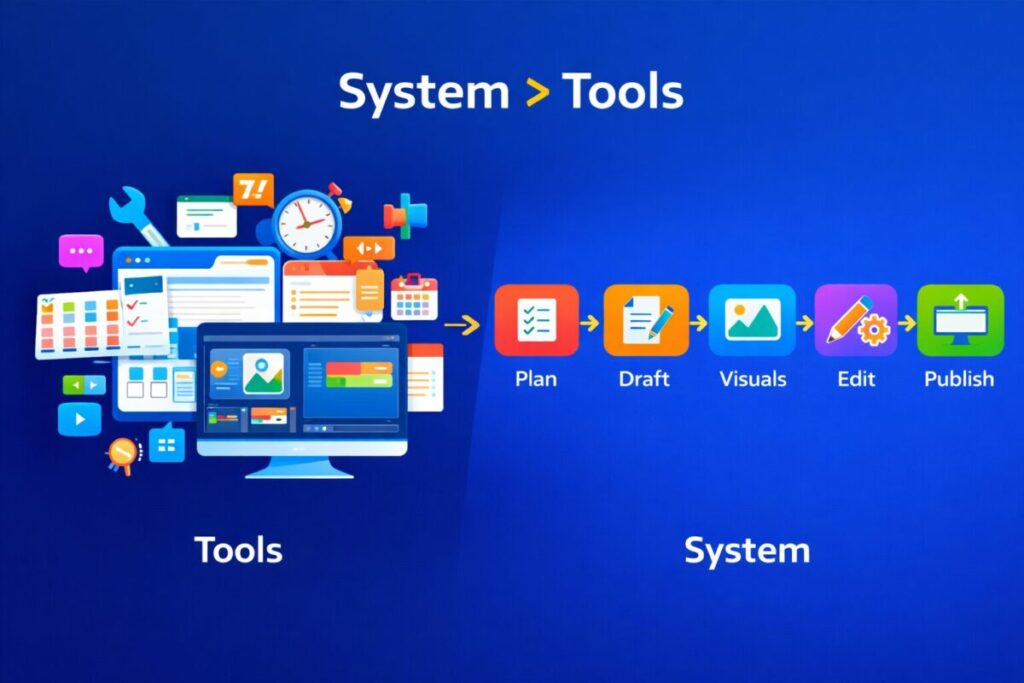
Now here’s the fun part: when you combine a simple workflow with AI content creation tools, you can create faster without feeling overwhelmed or robotic. You don’t need fancy setups. You don’t need 12 subscriptions. You need a repeatable system you can follow even on low-motivation days.
In this guide, I’ll share my step-by-step workflow that works for beginners. I’ll also show real examples for Instagram and YouTube, plus prompts you can copy-paste, a repurposing plan, a checklist, ratings, and a clear FAQ.
Because you don’t need more motivation. You need a system that makes publishing easier. ✅
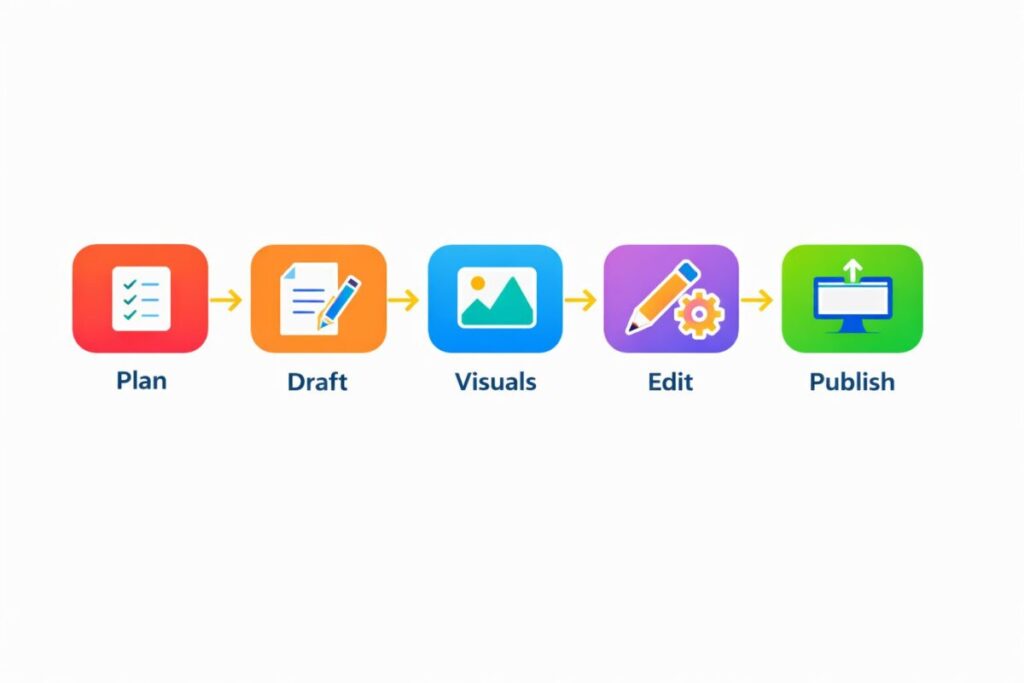
The simple workflow in one line ✅
Here’s the whole system:
Plan → Draft → Visuals → Edit → Publish (→ Repurpose)
That’s it. That’s the workflow.
And yes, it really can be that simple.
Why AI content creation tools work best inside a workflow 🧠
A lot of beginners use AI randomly:
- today for captions
- tomorrow for a script
- next week for a blog
- then they change tools and start over
This feels busy, but it’s not efficient. You’re not building momentum. You’re restarting every time.
AI content creation tools become powerful when you give them structure. When you know your next step, AI becomes a helper, not a distraction.
Because tools without a plan create chaos.
Because tools without a plan create confusion.
Because tools without a plan create procrastination.
Step 1: Plan (10–20 minutes) 🧠
Planning is where creators win. It’s not “thinking for hours.” It’s choosing one clear direction.
What to plan (simple version)
Answer these 4 questions:
- Who is this for? (beginners, students, creators, etc.)
- What problem does it solve?
- What is the main promise? (what will they learn?)
- What is the CTA? (follow, subscribe, read next, comment)
How AI content creation tools help in planning
- topic ideas
- angles and hooks
- outlines (H2 structure)
- beginner-friendly examples
- content calendars
Copy-paste prompt (topic + hook)
- “Give me 12 beginner-friendly content ideas about (topic). For each idea, give 2 hooks. Then choose the best 3 ideas for beginners and explain why.”
Copy-paste prompt (outline)
- “Create a clear outline for a post/video about (topic). Use simple headings, short bullet points, and include an FAQ section with 5 questions.”
My quick planning rule (prevents overthinking)
If I can’t choose between ideas, I choose the one that:
- is easiest to explain
- solves a real beginner problem
- fits into one clear sentence
That’s usually the best one.
Step 2: Draft (30–75 minutes) ✍️
Drafting is where AI content creation tools save the most time. But the secret is not “write everything at once.” The secret is draft in sections.
Drafting rule: one section at a time ✅
Instead of asking AI for a full 2000-word article in one go, ask for:
- introduction
- section 1
- section 2
- section 3
- checklist
- FAQ
Then you combine and polish.
This reduces repetition and keeps you in control.
Blog draft prompt (section-by-section)
- “Write the introduction only. Keep it friendly, simple, and short. Use short paragraphs. Add one bullet list. Avoid repetition.”
Then:
- “Write section 1 (topic). Keep it under 250 words. Add a mini example. Use transition words.”
YouTube draft prompt (script + pacing)
- “Write a 6–8 minute YouTube script on (topic). Add a strong hook, clear sections, and voice pauses every 20–30 seconds. Keep language simple and conversational.”
Instagram carousel draft prompt (7 slides)
- “Write a 7-slide carousel: Slide 1 hook, Slides 2–6 tips, Slide 7 CTA. Keep each slide under 12 words. Make it beginner-friendly and easy to understand.”
My “humanizing” trick (works every time)
After the draft, I add 3 lines:
- what I personally believe
- one mistake beginners make
- one quick fix
That small touch makes your content feel real.
Step 3: Visuals (15–45 minutes) 🎨
Visuals decide clicks. People can love your content, but first they need to click. That’s why visuals matter for blogs, YouTube thumbnails, and Instagram carousels.
What AI content creation tools can do for visuals
- generate image ideas per section
- create infographic text
- suggest thumbnail concepts and layouts
- create scene lists (for faceless videos)
- generate simple background visuals (optional)
Blog visuals (simple and effective)
For a blog post, I aim for:
- 1 hero image (top)
- 1 table or infographic (mid)
- 1 checklist graphic (near end)
- 2 supporting visuals (optional)
YouTube visuals
For YouTube, I aim for:
- 1 main thumbnail concept + 2 backups
- 8–12 scene visuals (if it’s image-based video)
- 1 “branding” element repeated (font, color, icon)
Instagram visuals
For Instagram:
- 1 template style
- consistent font sizes
- icons that match your niche
- spacing that stays the same across posts
Copy-paste prompt (image plan)
- “Give me 12 image ideas for this topic. Split into: hero image, infographic/table, checklist graphic, and section visuals. Make them beginner-friendly.”
Step 4: Edit (where quality happens) ✅
Editing is the difference between “AI content” and “good content.”
AI can help you draft, but humans create trust. Even if your content is faceless, your voice should feel human.
My 3-pass editing method (super simple)
Pass 1: Remove repetition
- delete repeated ideas
- cut filler
- shorten long sentences
Pass 2: Add voice
- add one opinion
- add one personal line
- add one “what I learned” sentence
Pass 3: Make it scannable
- add bullets
- add mini headings
- add quick summary box
Because readers scan.
Because readers scroll.
Because readers decide fast.
Copy-paste prompt (clarity + flow)
- “Rewrite this section to be clearer and more human. Keep sentences short. Add transition words. Remove repetition. Keep a friendly tone.”
Step 5: Publish + Repurpose (the growth step) 🚀
Publishing is not the end. Repurposing is where the real growth happens, especially for beginners.
The “one idea → many posts” method
One topic becomes:
- 1 blog post
- 1 YouTube video
- 3 shorts
- 1 Instagram carousel
- 5 captions (for posts or reels)
That’s a full week of content from one idea.
Copy-paste prompt (repurpose)
- “Turn this blog/script into: 1 Instagram carousel (7 slides), 3 short-form video scripts (30 seconds each), and 5 captions.”
Real examples: Instagram + YouTube workflows (expanded) ✅
Example A: Instagram carousel workflow (3 posts/week) 📱
Goal: post consistently without burnout.
Day 1: Plan
Use AI to generate 10 ideas, pick 3.
Day 2: Draft slides
AI writes 7-slide carousels.
Day 3: Design templates
Use one Canva template:
- same fonts
- same colors
- same icons
- same spacing
Day 4: Batch create
Design all 3 posts in one session.
Day 5: Post + engage
Post one carousel, reply to comments, save feedback for next post.
Sample carousel topic
- “5 mistakes beginners make with AI content”
How AI helps here
- better hooks
- simpler slide text
- faster captions
- CTA ideas (“comment ‘guide’ for part 2”)
Example B: YouTube workflow (1 video/week + 3 shorts) 🎥
Goal: one strong long video + easy shorts.
Day 1: Topic + hook
AI gives 15 hooks; choose one.
Day 2: Script + scene list
AI writes script with pauses and scene prompts.
Day 3: Visuals + thumbnail
AI suggests 3 thumbnail layouts:
- bold text style
- minimal icon style
- face/character style (optional)
Day 4: Edit video
Add:
- captions
- gentle zooms
- simple transitions
- background music low volume
Day 5: Repurpose into shorts
AI creates 3 short scripts:
- one problem clip
- one quick tip clip
- one “my opinion” clip
How AI helps here
- faster scripting
- cleaner pacing
- more repurposing options
- fewer “blank screen” moments
Beginner tool stack (simple and realistic) 🧰
You don’t need 10 tools. Start with 2–3:
- Writer: ChatGPT / Claude / Gemini
- Design: Canva
- Video editing: CapCut (or Premiere if you already use it)
- Optional visuals: Leonardo or Midjourney (only if you need generated images)
That’s a strong beginner stack.
My opinion section (what actually makes this work) 🧠
Here’s my honest opinion: AI doesn’t make creators successful. Consistency does. AI helps you become consistent by reducing the hard parts—blank page fear, slow drafting, and repetitive editing.
But if you don’t follow a workflow, AI becomes entertainment instead of progress. You test prompts, you explore features, you keep switching tools, and you delay publishing.
That’s why I like the 5-step system. It’s simple enough to repeat. It’s flexible enough for any platform. And it forces you to move forward.
If you follow this workflow for 30 days, you’ll build momentum. And momentum is what makes content creation feel easier over time.
Ratings (beginner workflow) ⭐
- Simplicity: 9/10
- Speed: 8.9/10
- Quality (with editing): 8.6/10
- Beginner friendly: 9/10
- Long-term consistency: 8.8/10
- Overall: 8.8/10
Quick checklist (save this) ✅
Before publishing:
- Did I pick one clear topic and one audience?
- Did I remove repetition and filler?
- Did I add at least one opinion or personal line?
- Did I add visuals (even simple ones)?
- Did I repurpose into at least 2 extra pieces?
If yes, publish.
FAQ: A simple workflow using AI content creation tools ❓
1) Do I need multiple AI content creation tools to follow this workflow?
No. You can do this workflow with one writing tool and one design tool. Extra tools help later, but beginners should keep it simple to avoid overwhelm.
2) How do I stop content from sounding robotic?
Draft in sections, then do a human voice pass. Remove repetition, shorten sentences, and add your opinion or a real example. That makes the content feel like you, not a machine.
3) Can this workflow work for Instagram only?
Yes. Plan the topic, draft slide text with AI, design in a template, edit for clarity, and publish. Then repurpose the carousel into a reel or story for extra reach.
4) Can this workflow work for YouTube?
Yes. Plan hook + outline, draft script with pauses, generate scene ideas, edit video and captions, then repurpose into shorts. This is one of the easiest ways to grow without burnout.
5) How long should I stick with one workflow before changing it?
I recommend at least 30 days. That gives you enough time to notice what’s slow and what’s easy. Changing too often resets your momentum.
zl46zm
5pbd9m
owmm80